Open Sourcing a Python Project the Right Way in 2024
Every Python developer I've talked to has written some code that others would find useful. At the same time, they've all spent days, if not longer, wrestling with the tooling and packaging that comes with the language. My aim with this article is to simplify the process of open-sourcing your Python code as much as possible. By the time you finish reading, you'll know how to take your existing code base and turn it into an open source project that's easy to use and contribute to.
This was inspired by:
Trying to open-source my package AgentRun and struggling for a few days with Python tooling
Jeff Knupp excellent article on how to open source a Python project hitting the 10+ year mark and needing an update
Simon Willison updated cookiecutter tool python-lib that did most of the heavy lifting with the pain of automating the publishing process to PyPI.
Tools and Concepts
When you're gearing up to open source a Python project, there are a handful of tools and concepts that really come in handy. I'm going to walk you through some of the essentials that I've found invaluable. Keep in mind, my recommendations are based on personal experience, so they might be a bit subjective.
Let's break it down:
Project Layout: How to structure your files.
The pyproject.toml File: This is crucial for project settings.
Pytest: For all your testing needs.
GitHub Actions: Automate workflows directly from your GitHub repository.
MkDocs: For awesome documentation.
PyPI Trusted Publishing: Get your package out there easily.
Cookiecutter: A lifesaver for starting projects quickly.
Recipe: Step-by-step guide to get you rolling.
If you're already familiar with these tools, feel free to jump straight to the Recipe section where you can follow the practical steps to get your project live.
Project Layout
When you're open sourcing a Python project, the way you organize your project layout is crucial. It's often the first thing potential contributors or users notice. A cluttered or confusing structure can be overwhelming for newcomers, so it's essential to get it right from the start.
Every project should include at least three key directories:
A
docsdirectory for all your project documentation.A directory named after your project where the actual Python package lives.
A
testsdirectory to hold all your test files.
On top of these, you'll typically have several important top-level files like LICENSE, README.md, and possibly a few others. However, it's wise to keep the number of top-level files to a minimum. To give you a clearer picture, here's a simplified snapshot of the layout for one of my projects, AgentRun.
├── .github
│   └── workflows
│       ├── publish.yml
│       └── test.yml
├── .gitignore
├── LICENSE
├── README.md
├── agentrun
│   └── __init__.py
├── agentrun-api
├── docs
├── mkdocs.yml
├── pyproject.toml
└── tests
    └── test_agentrun.py
The pyproject.toml File
The pyproject.toml file is a configuration file for Python projects, standardized by PEP 518. It specifies build system requirements and can be used to configure tools like black, isort, and pytest and many others. This file is crucial for modern Python packaging and dependency management.
In the context of open-sourcing a Python package, pyproject.toml plays several roles:
Dependency Specification: It declares build dependencies required to compile your package from source. This ensures that anyone trying to build your package from the source will have the right tools installed automatically.
Package Metadata: It can include metadata about your package such as name, version, authors, and more. This information is essential for package distribution and maintenance.
Tool Configuration: It allows you to configure various tools used during development in a single, standardized file. For example, settings for formatters, linters, and test frameworks can be specified here, ensuring consistency across environments.
Build System Declaration: It declares which build backend (like
setuptools,flit, orpoetry) is used to build your package. This is crucial for reproducibility and compatibility in different environments.
The difficult thing about this part is that you have many options and configurations you can choose from. In the beginning I recommend to keep it simple and gradually add more tools as you are get more comfortable.
Here is a minimal pyproject.toml similar to the one generated by python-lib that I recommend to start with.
[project]
name = "Your project name"
version = "0.1"
description = "Your project description"
readme = "README.md"
requires-python = ">=3.8"
authors = [{name = "your name"}]
license = {text = "the license choosen from the project"}
classifiers = [
    "License :: OSI Approved :: {{ the license name }} "
]
dependencies = []

[build-system]
requires = ["setuptools"]
build-backend = "setuptools.build_meta"

[project.urls]
Homepage = "your github repo page"

[project.optional-dependencies]
test = ["pytest", "mkdocs"]
This pyproject.toml file doesn't have any dependencies and only pytest and mkdocs for the test version of the package. So, this is just a starting point and would need to be adjusted depending on your own project needs.
Pytest
When publishing an open-source package, it's good to include some tests. This not only invites contributors to your project but also reassures users about the reliability of your package. Without tests, there's a risk that contributors might unintentionally break existing features, and potential users might hesitate to depend on your software.
Pytest is one of the most popular Python testing framework and I recommend starting from the beginning with it.
Let's imagine you have a package that simply increments a number by 1. Here is the code in your package/__init__.py :
def inc(x):
    return x + 1
Then under your tests/ directory. You should have a file test_inc.py that uses Pytest to test your code.
from package import inc

def test_inc():
    assert inc(3) == 4
To run your tests, simply type pytest in the terminal. Pytest will execute all your tests and report back whether they passed or failed. This immediate feedback loop is invaluable for maintaining a robust codebase.
Github Actions
When you're planning to share and collaborate on a project, having a solid CI/CD setup is important. Continuous integration (CI) refers to the practice of automatically integrating and testing code changes into a shared source code repository without breaking anything. Continuous Delivery, automates the release of validated code to a repository following the tests that happen in CI.
At a minimum, you want your code tested automatically every time someone pushes a new change. There are many vendors and tools that can do that, but I like Github Actions. Github is by far the most popular platform to store and share code and having native CI/CD in the same place as your code makes things easier.
You store all your Github actions in a directory called .github/workflows . Here is a simple github action that tests your code every time someone's open a Pull Request or pushes code.
name: Test

on: [push, pull_request]

permissions:
  contents: read

jobs:
  test:
    runs-on: ubuntu-latest
    strategy:
      matrix:
        python-version: ["3.10"]
    steps:
    - uses: actions/checkout@v4
    - name: Set up Python ${{ matrix.python-version }}
      uses: actions/setup-python@v5
      with:
        python-version: ${{ matrix.python-version }}
        cache: pip
        cache-dependency-path: pyproject.toml
    - name: Install dependencies
      run: |
        pip install '.[test]'
    - name: Run tests
      run: |
        pytest
Mkdocs
MkDocs is a fast, and simple static site generator that's geared towards building project documentation. Documentation source files are written in Markdown, and configured with a single YAML configuration file - mkdocs.yml.
There are many plugins, themes, and automation recipes that helps with documenting your package. But to start, you really need only 2 things.
mkdocs.ymlconfiguration fileindex.mdfile under thedocs/directory
The mkdocs.yml only needs a site name and a site url to be valid. Here is a minimal example:
site_name: My Documentation
site_url: https://example.com
PyPI Trusted Publishing
Your code should now be ready for you to build and distribute to PyPI. The process is quite simple with PyPI Trusted publishing mechanism. You need to sign into PyPI and create a new “pending publisher”. Here is what that looks like.
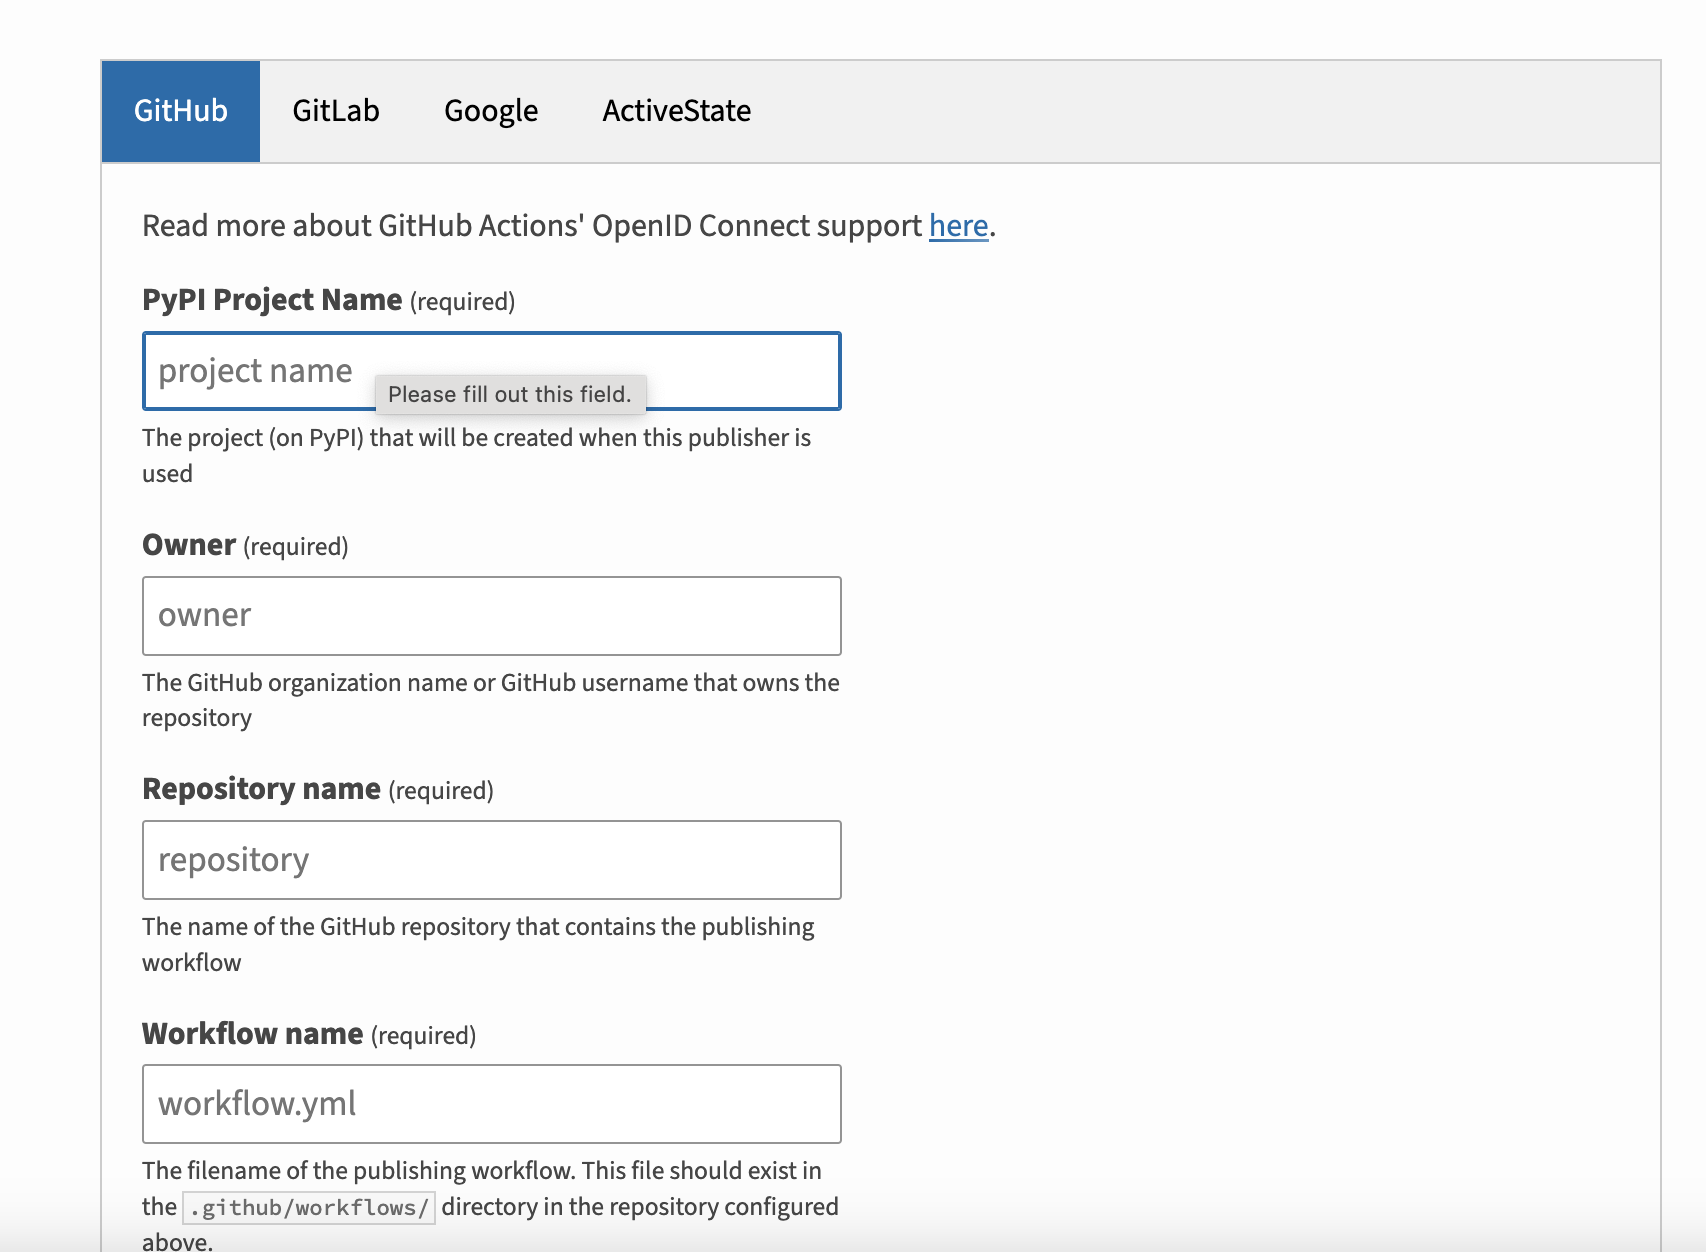
Trusted publishing is essentially you allowing your GitHub repository your-name/your-package to publish packages with the name your-package via a github action.
The next step is to create a publish.yml in your .github/workflows that uses Github Action to publish your code to PyPI automatically whenever you create a release.
name: Publish Python Package
on:
  release:
    types: [created]

permissions:
  contents: read

jobs:
  test:
    runs-on: ubuntu-latest
    strategy:
      matrix:
        python-version: ["3.10"]
    steps:
    - uses: actions/checkout@v4
    - name: Set up Python ${{ matrix.python-version }}
      uses: actions/setup-python@v5
      with:
        python-version: ${{ matrix.python-version }}
        cache: pip
        cache-dependency-path: pyproject.toml
    - name: Install dependencies
      run: |
        pip install '.[test]'
    - name: Run tests
      run: |
        pytest
  deploy:
    runs-on: ubuntu-latest
    needs: [test]
    environment: release
    permissions:
      id-token: write
    steps:
    - uses: actions/checkout@v4
    - name: Set up Python
      uses: actions/setup-python@v5
      with:
        python-version: "3.12"
        cache: pip
        cache-dependency-path: pyproject.toml
    - name: Install dependencies
      run: |
        pip install setuptools wheel build
    - name: Build
      run: |
        python -m build
    - name: Publish
      uses: pypa/gh-action-pypi-publish@release/v1
Let's simplify this file and see what's happening:
Essentially, we have two main tasks here: testing and deploying.
In the deployment section, we're tackling a couple of key activities. First off, we install the necessary tools for packaging—these include
setuptools,wheel, andbuild. Next, we use Python’s build module to actually build the package. Finally, we publish the package to PyPI using thepypa/gh-action-pypi-publish@release/v1action.
So, in a nutshell, we're testing the code, building it, and then pushing it up to PyPI.
Cookiecutter
Cookiecutter is a command line tool that automates the process of starting a project. Instead of going through all these steps manually, you can just run cookiecutter and the tool will generate all the necessary files and directory structure.
For tools discussed, I tried to follow python-lib structure and recommendations (only adding mkdocs as an extra dependency). So, to achieve the same results you can:
Install cookiecutter -
pipx install cookiecutterRun it -
cookiecutter gh:simonw/python-libOptional: Add
mkdocsas discussed above.
There are many cookiecutter templates around with all kind of different options. The truth is, you really want a minimal well-maintained one.
Cookiecutter is great as a starting point, but relying completely on it without understanding all the tools inside can be painful when things go wrong. That's why I recommend python-lib which gives you the minimum tools you need to publish your package and nothing else.
Recipe
Start by creating a PyPI account if you don't already have one. Check to ensure the package name you want isn’t already taken.
Next, set up a new GitHub repository with your package name.
Install Cookiecutter if you haven't already
pipx install cookiecutterRun Cookiecutter and answer the prompts to generate your project skeleton
cookiecutter gh:simonw/python-libCreate a virtual environment in your project directory and activate it.
 cd my-new-library
 # Create and activate a virtual environment:
 python3 -mvenv venv
 source venv/bin/activate
 # Install dependencies so you can edit the project:
 pip install -e '.[test]'
 # With zsh you have to run this again for some reason:
 source venv/bin/activate
 # test the example function
 pytest
Initialize a Git repository, commit the initial project structure, and push it to GitHub
 git init
 git add -A
 git commit -m "Initial structure from template"
 git remote add origin https://github.com/{{github_name}}/{{repo_name}}.git
 git push -u origin main
Check the GitHub Actions tab in your repository to confirm that the test workflow is running. This setup ensures your code is tested with every push.
On your local machine, create a 'develop' branch for ongoing development.
git checkout -b "develop"Add
MkDocsto your development dependencies in thepyproject.tomlfile.# nothing else changed [project.optional-dependencies] test = ["pytest", "mkdocs"]Create a docs directory and add
index.mdin there. You can copy the info in theREADME.mdtoindex.mdfor now.Create a
mkdocs.ymlfile. Here is a minimal example.site_name: <your_package> documentation site_url: https://<your_username>.github.io/<repo_name>-docs/Install mkdocs and deploy a documentation site.
# update the dependencies
pip install -e '.[test]'
# test and adjust the documentations as needed
mkdocs serve
# deploy your documentations to github pages
mkdocs gh-deploy
# Add site/ to your .gitignore file
echo "site/" >> .gitignore
When you are happy with the changes, commit your documentation changes to the 'develop' branch and push
git add -A
git commit -m "documentation"
git push -u origin develop
For new features, create a feature branch, add your code, and then merge it back into 'develop' when ready
git checkout -b "new-feature"
# work on your code until done
git add -A
git commit -m "feature complete"
git checkout develop
# now we merge the completed feature
git merge "new-feature"
When ready to release, merge 'develop' into 'main', pushing the changes to GitHub
💡Don't forget to upgrade your version in pyproject.toml every time you merge develop into main after the initial release.git checkout main git merge develop git pushOn Github - create a new release for your package:
On your repository’s main page, click on "Releases" which is typically found on the right side of the sub-navigation menu under the code tab.
Click the “Draft a new release” button or the “Create a new release” link if you don't have any releases yet and fill the information there.- On release creation, the publish Github action would run and automatically publish your releases to PyPI
And that's it. Congratulations, you have now published your first open-source Python package with all what you need for future contributors and users.
For a practical example, check out the AgentRun repository, which uses the same tools and processes outlined here.